Steps Of Storyboarding, The Best Guide: How To Make Storyboard (2025)
Contents
- 1 Step 1: Understanding the Project Requirements
- 2 Step 2: Conceptualizing: One of the Pillar Steps of Storyboarding
- 3 Step 3: Breaking Down the Script into Scenes
- 4 Step 4: Sketching the Frames
- 4.1 4.1. Preparing Your Tools
- 4.2 4.2. Starting with Rough Thumbnails
- 4.3 4.3. Focusing on Visual Composition
- 4.4 4.4. Sketching Characters and Actions
- 4.5 4.5. Highlighting Camera Angles and Movements
- 4.6 4.6. Adding Minimal Background Details
- 4.7 4.7. Maintaining Consistency Across Frames
- 4.8 4.8. Balancing Detail with Clarity
- 5 Step 5: Adding Annotations and Notes
- 6 Step 6: Reviewing and Revising
- 7 Step 7: Finalizing the Storyboard
- 8 Tips for Effective Storyboarding
- 8.1 1. Focus on Clarity Over Detail
- 8.2 2. Plan for the Entire Narrative
- 8.3 3. Experiment with Different Camera Angles and Shots
- 8.4 4. Maintain Consistency in Character Design
- 8.5 5. Use Clear and Concise Annotations
- 8.6 6. Think About Pacing and Timing
- 8.7 7. Stay Flexible and Open to Changes
- 8.8 8. Focus on the Big Picture, Then Zoom Into Details
- 8.9 9. Collaborate with Your Team
- 8.10 10. Consider the Medium and Format
- 8.11 Conclusion
Storyboarding is the backbone of visual storytelling, acting as a bridge between raw ideas and the final product. Whether you’re creating a film, animation, marketing video, or even a presentation, you have to follow the specific steps of storyboarding in storyboarding to ensure a seamless flow of ideas while capturing the essence of the narrative.
At its core, a storyboard is a visual representation of a story broken down into individual frames. Each frame captures a specific scene or action, offering a glimpse into how the story will unfold. By laying out these visuals in sequence, creators can anticipate potential challenges, streamline production, and ensure that the narrative resonates with the intended audience.
In this article, we will explore the Steps of Storyboarding, breaking it down into manageable phases that cater to beginners and professionals alike. From understanding project requirements to finalizing polished visuals, each step plays a crucial role in crafting a compelling storyboard.
Step 1: Understanding the Project Requirements
The first and most crucial step in storyboarding is gaining a deep understanding of the project’s requirements. Without a clear grasp of the purpose, audience, and goals, even the most creative ideas can lose their direction. This step sets the foundation for an effective and impactful storyboard.
1.1. Identifying the Purpose of the Storyboard
Every storyboard begins with a purpose. Is it for a film, a marketing campaign, a video game, or an educational video? The purpose determines the tone, style, and overall approach. For instance:
- A commercial storyboard focuses on selling a product or service through compelling visuals.
- A film storyboard captures dramatic elements, character arcs, and emotional beats.
- An educational storyboard emphasizes clarity and instructional flow.
Knowing the end goal ensures your storyboard aligns with the project’s objectives and effectively communicates its message.
1.2. Understanding the Target Audience
Who are you creating this storyboard for? The target audience influences every aspect of your work, from the storyline to the visual style. For example:
- For a younger audience, you might choose vibrant colors, simple visuals, and relatable characters.
- For a professional or technical audience, the storyboard may require precision, minimalism, and structured narratives.
Consider factors such as age, interests, cultural background, and preferences to make the storyboard more engaging and relatable.
1.3. Aligning with Project Goals
It’s essential to collaborate with stakeholders or the creative team to align the storyboard with the project’s vision. Ask the following questions to clarify expectations:
- What message should the storyboard convey?
- Are there specific themes, styles, or visual references to incorporate?
- What constraints (budget, time, or resources) might affect the storyboard?
By gathering this information, you ensure that the storyboard is practical and adheres to the project’s overall framework.
1.4. Setting a Strong Foundation
Once you understand the requirements, compile the gathered information into a clear brief or checklist. This will serve as a reference throughout the storyboarding process. A well-documented foundation saves time, prevents rework, and keeps the creative process on track.
By thoroughly understanding the project requirements, you establish a roadmap for the entire storyboard. This step enables you to transform abstract ideas into a focused visual narrative, setting the stage for the next steps in the storyboarding journey.
Step 2: Conceptualizing: One of the Pillar Steps of Storyboarding
After understanding the project requirements, the next step in storyboarding is conceptualizing the story. It is one of the most important steps of storyboarding. This phase involves shaping your ideas into a cohesive narrative that captures the essence of the project while keeping the audience engaged. A strong concept is the backbone of a successful storyboard, and this step ensures that your vision begins to take form.

2.1. Developing the Core Idea
At the heart of every great story is a compelling idea. Start by defining the central theme or message you want to convey. Ask yourself:
- What story am I trying to tell?
- What emotions do I want the audience to feel?
- What action or reaction do I want to inspire?
For example, if you’re storyboarding for an animation, your core idea might revolve around a hero’s journey, a moral lesson, or a humorous situation. Simplify your idea into a sentence or two to maintain clarity and focus.
2.2. Creating a Rough Script or Outline
Once the core idea is established, expand it into a rough script or outline. This step organizes your thoughts into a structured format, breaking the story into its beginning, middle, and end. Focus on these elements:
- Introduction: Set the stage by introducing the characters, setting, and premise.
- Conflict: Present the main challenge or obstacle the characters must overcome.
- Resolution: Conclude the story with a satisfying or thought-provoking ending.
A well-defined outline ensures that your story flows naturally and keeps the audience hooked from start to finish.
2.3. Ensuring a Clear Narrative Flow
A clear narrative flow is critical for effective storytelling. Each event should logically lead to the next, creating a seamless progression. To achieve this:
- Identify cause-and-effect relationships between scenes.
- Avoid unnecessary details that might confuse or distract the audience.
- Ensure pacing is balanced—don’t rush critical moments or linger too long on less significant ones.
Consider using tools like flowcharts or diagrams to visualize the story’s progression before diving into visuals.
2.4. Incorporating Creative Elements
This is where you bring in the unique elements that make your story stand out. Think about:
- Characters: Who are they? What motivates them? How do they evolve?
- Setting: Where does the story take place? Does the environment influence the narrative?
- Mood and Tone: Is the story serious, lighthearted, suspenseful, or dramatic?
Use references, mood boards, or sketches to brainstorm these elements and ensure they align with the project’s goals.
2.5. Building a Foundation for Visuals
While this step focuses on the narrative, begin thinking visually. Identify moments that will translate well into storyboard frames, such as:
- Dramatic reveals
- Emotional close-ups
- Action sequences
These key moments will form the visual highlights of your storyboard and keep the audience engaged.
Step 3: Breaking Down the Script into Scenes
With a clear story concept and outline in place, the next step in storyboarding is breaking down the script into manageable scenes. This process transforms your narrative from an abstract idea into tangible segments, each representing a key moment in the story. By organizing the script into scenes, you ensure that the flow of the storyboard is smooth, logical, and engaging.
3.1. Identifying Key Scenes
Not every part of the script needs to be visualized in detail. Focus on identifying the most important scenes that:
- Drive the narrative forward.
- Showcase pivotal moments or turning points.
- Capture emotional highlights or significant actions.
For instance, in a film storyboard, these might include the protagonist’s introduction, the climax, or a key dialogue exchange. Prioritize scenes that define the story’s structure and leave a lasting impact on the audience.
3.2. Breaking the Story into Visual Moments
Divide your story into smaller, digestible parts. This can be done by isolating moments that occur in:
- New Locations: Each change in setting often signifies a new scene.
- Transitions in Time: Flashbacks, flash-forwards, or time skips require distinct visual representation.
- Major Actions or Events: Capture movements, fights, or any dynamic sequences that drive the plot.
Think of each scene as a building block that adds to the overall narrative.
3.3. Defining the Sequence of Events
The sequence is critical for maintaining coherence and pacing. Arrange your scenes in a logical order that aligns with the narrative structure established in the script. Ask yourself:
- Does each scene naturally lead to the next?
- Are transitions between scenes clear and purposeful?
- Does the sequence maintain the desired pacing, whether fast or slow?
If necessary, use story beats or thumbnails to test the flow before committing to detailed visuals.
3.4. Breaking Scenes into Shots
Within each scene, further divide the action into individual shots. Shots are the specific frames or angles that will eventually make up the storyboard. For each shot, consider:
- Composition: What will the audience see?
- Duration: How long will the action last?
- Perspective: Which camera angle best captures the mood or action?
This step provides the framework for sketching the storyboard panels in the next phase.
3.5. Prioritizing Important Moments
While breaking down the script, decide which moments require the most emphasis. These could be:
- Climactic Scenes: High-stakes moments that deliver the story’s emotional or narrative peak.
- Character-Revealing Shots: Frames that showcase key emotions, reactions, or interactions.
- Symbolic Imagery: Visuals that convey deeper meaning or themes.
Highlighting these moments ensures they get the attention they deserve during the sketching phase.
3.6. Creating a Scene-by-Scene Blueprint
Once the script is broken down into scenes and shots, compile this information into a scene-by-scene blueprint. Include:
- Scene descriptions
- Shot details (camera angles, key actions, and dialogue)
- Notes on transitions between scenes
This blueprint acts as a roadmap, helping you stay organized as you move into the next step of sketching the storyboard frames.
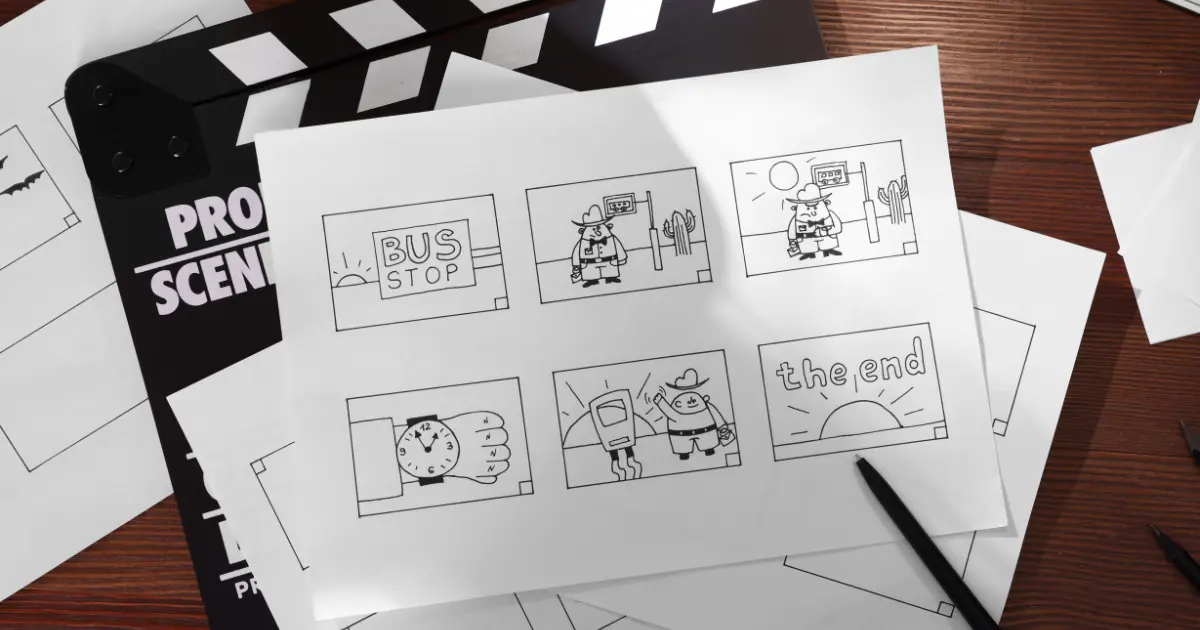
Step 4: Sketching the Frames
With the script broken down into scenes and shots, the next step in storyboarding is sketching the frames. This is where the story truly begins to come to life. Each frame represents a visual snapshot of the narrative, capturing the essential actions, emotions, and transitions in a way that’s clear and engaging.
4.1. Preparing Your Tools
Before you begin sketching, gather the right tools based on your preferred medium. You can choose between:
- Traditional Tools: Pencil, eraser, ruler, and paper for quick hand-drawn sketches.
- Digital Tools: Software like Adobe Photoshop, Storyboarder, or Toon Boom for precise, scalable sketches.
Regardless of the medium, keep your setup simple and focused on clarity.
4.2. Starting with Rough Thumbnails
Begin by creating small, rough sketches known as thumbnails. These quick, simplified drawings help:
- Visualize the composition of each frame.
- Experiment with camera angles and character positioning.
- Test the flow of scenes without committing to detailed artwork.
Thumbnails serve as a foundation, allowing you to iterate quickly before refining the visuals.
4.3. Focusing on Visual Composition
Each frame should tell a story visually. Pay attention to:
- Framing: Use close-ups, wide shots, or medium shots to convey the mood and focus.
- Rule of Thirds: Position key elements along gridlines to create balanced and engaging visuals.
- Depth: Add foreground, midground, and background elements to create a sense of space.
The composition should guide the viewer’s eye naturally, emphasizing important actions or emotions.
4.4. Sketching Characters and Actions
Characters and their actions are the heart of any storyboard frame. Focus on:
- Expressions: Use facial features to convey emotions clearly.
- Body Language: Capture movement and posture to show intent or action.
- Silhouettes: Ensure characters are easily recognizable, even in rough sketches.
Keep your sketches loose but purposeful—details can be added in later stages if necessary.
4.5. Highlighting Camera Angles and Movements
Storyboard frames often indicate how the “camera” captures the action. Include:
- Angles: Use low angles for dramatic tension, high angles for vulnerability, or neutral angles for balance.
- Movements: Represent camera pans, zooms, or tilts with arrows and annotations.
- Focus: Indicate depth of field or key focus areas to draw attention to specific elements.
These visual cues help the production team understand the intended cinematic effects.
4.6. Adding Minimal Background Details
While characters and actions take center stage, the background plays a supporting role. Include enough detail to:
- Establish the setting and atmosphere.
- Provide context for the characters’ actions.
- Avoid overloading the frame with unnecessary elements.
For example, a rough outline of a cityscape can suggest a location without detracting from the action in the foreground.
4.7. Maintaining Consistency Across Frames
Consistency is key in creating a cohesive storyboard. Ensure:
- Characters remain visually recognizable from frame to frame.
- Props, settings, and lighting are consistent with the narrative.
- Action sequences flow smoothly and logically between frames.
If working with a team, establish visual guidelines to maintain uniformity.
4.8. Balancing Detail with Clarity
The goal of sketching storyboard frames is to communicate ideas, not to create polished artwork. Focus on:
- Clarity: Ensure that every frame is easy to understand at a glance.
- Simplicity: Avoid adding unnecessary details that might clutter the visuals.
Keep in mind that the storyboard is a planning tool—it doesn’t need to look perfect but should effectively convey the story.
Step 5: Adding Annotations and Notes
Once the storyboard frames are sketched, the next step is to add annotations and notes to provide essential context and details that are not immediately evident from the visuals alone. These notes serve as a guide for the creative team, ensuring everyone involved understands the story, camera techniques, and narrative intentions.

5.1. Indicating Camera Angles and Movements
Annotations are crucial for explaining how the “camera” interacts with the scene. Use notes to describe:
- Angles: Specify low, high, or Dutch angles for dramatic effect.
- Movements: Indicate pans, zooms, tilts, or tracking shots with arrows or written instructions.
- Focus: Highlight the focal point, such as a character, prop, or part of the scene, to ensure clarity in the frame.
For instance, if the camera starts with a wide shot and zooms into a close-up, an annotation should explain this transition.
5.2. Noting Dialogue and Sound Effects
Dialogue and audio cues enhance the storytelling and guide the mood. Include:
- Character Dialogue: Write down what characters say in the frame or scene, aligning it with the action.
- Voiceovers: Specify if a narrator or off-screen character speaks during the frame.
- Sound Effects: Mention relevant sounds like footsteps, explosions, or environmental noise (e.g., birds chirping or rain falling).
Use clear labels such as [Character Name] or [Sound Effect: Rain] to distinguish between visual and audio elements.
5.3. Highlighting Key Actions and Transitions
Annotations can clarify specific actions or transitions that might not be obvious from the sketches. Examples include:
- Character Movement: Describe how characters move within the frame (e.g., “Character A exits stage left”).
- Props or Interactions: Explain interactions with objects (e.g., “Character picks up the glowing orb”).
- Scene Transitions: Use terms like fade to black, cut to a close-up, or dissolve to indicate how one scene shifts to the next.
These notes ensure smooth alignment between the storyboard and the final production.
5.4. Describing Emotions and Mood
While sketches convey some emotion, written notes can enhance this by:
- Specifying character feelings, such as fear, joy, or anger.
- Indicating the intended atmosphere, like tension during a confrontation or serenity in a peaceful setting.
- Suggesting lighting, colors, or shadows that convey mood (e.g., “Low-key lighting for suspense”).
This information helps the team accurately interpret and enhance the storyboard’s emotional depth.
5.5. Clarifying Scene Details
Annotations provide additional context about elements like:
- Background Elements: Briefly describe significant details that are not fully illustrated, such as a bustling market or a quiet forest.
- Timing: Mention the duration of key actions or scenes (e.g., “Hold shot for 5 seconds”).
- Interactivity: Explain interactive elements in multimedia projects, like user interface overlays or clickable areas.
5.6. Including Technical Instructions
For complex projects like animations, technical instructions are essential. Add notes for:
- Special Effects: Mention visual effects like sparks, smoke, or magical glows.
- Animation Cues: Specify character movements, gestures, or expressions (e.g., “Character blinks twice before speaking”).
- Editing Notes: Highlight edits such as jump cuts or slow-motion sequences.
These details bridge the gap between the storyboard and the technical execution.
5.7. Keeping Notes Clear and Concise
While annotations are vital, they should not overwhelm the storyboard. Follow these guidelines:
- Use short, direct sentences.
- Keep notes in the margins or under the frames to avoid cluttering the visuals.
- Use consistent formatting, such as bullet points or brackets, for easy readability.
For example:
- [Dialogue: “We need to move now!”]
- [Sound Effect: Thunder rumbling]
- [Action: Camera pans from left to right]
Step 6: Reviewing and Revising
The final step in creating an effective storyboard is reviewing and revising it. This process ensures that the storyboard is clear, accurate, and aligned with the project’s goals. Storyboards are rarely perfect on the first attempt, so this step is crucial for refining the narrative, visuals, and details to make them as impactful and coherent as possible.
6.1. Reviewing for Story Consistency
Start by checking if the storyboard aligns with the narrative and project objectives:
- Does the story flow logically? Ensure scenes and transitions make sense.
- Are the emotions and tone consistent? Verify that the mood matches the intended audience and purpose.
- Are there any gaps? Look for missing scenes or actions that disrupt the story’s continuity.
Cross-reference the storyboard with the original script or concept brief to ensure nothing is overlooked.
6.2. Seeking Feedback
Collaboration and fresh perspectives are invaluable during this stage. Share your storyboard with:
- Creative Team: Get input from writers, directors, or animators for accuracy and feasibility.
- Stakeholders: Present the storyboard to clients or project leads to ensure it meets expectations.
- Peers: Feedback from colleagues or collaborators can provide insights into clarity and visual appeal.
Encourage constructive criticism and remain open to suggestions that enhance the storyboard.
6.3. Assessing Visual Clarity
Examine whether the visuals effectively communicate the intended actions and emotions:
- Are the sketches easy to understand? Even rough visuals should clearly convey the story.
- Do the characters and elements stand out? Ensure key actions and characters are emphasized in each frame.
- Are camera angles and movements clear? Verify that annotations and visual cues provide sufficient direction.
If anything appears confusing or ambiguous, revise the sketches or add clarifying notes.
6.4. Evaluating Technical Feasibility
Consider whether the storyboard is achievable within the project’s technical and budgetary constraints:
- Can the scenes be executed as drawn? Ensure the visual concepts align with available resources, tools, and skills.
- Do the effects and transitions work? Confirm that the technical notes are realistic and executable.
- Is the pacing appropriate? Check that the timing of each scene or shot aligns with the overall project duration.
Adjust the storyboard as needed to reflect practical limitations while maintaining creativity.
6.5. Refining Details
Polish the storyboard to address any inconsistencies or overlooked elements:
- Enhance annotations: Add or refine notes to ensure every frame is well-documented.
- Clean up visuals: Improve sketches for better readability, especially if the storyboard will be shared widely.
- Clarify transitions: Ensure smooth progression between scenes and shots with clearly defined transitions.
Refinement ensures the storyboard serves as a reliable blueprint for the production phase.
6.6. Conducting a Final Review
After incorporating feedback and making revisions, perform a final review to confirm:
- Completeness: Every scene, shot, and annotation is accounted for.
- Accuracy: The storyboard aligns with the project’s goals and requirements.
- Impact: The visuals and narrative effectively convey the desired message.
Walk through the storyboard as if you’re the audience to identify any remaining areas for improvement.
Step 7: Finalizing the Storyboard
The final step in the storyboarding process is to prepare the storyboard for presentation and production. Finalizing the storyboard ensures that all the creative elements are polished, cohesive, and ready to serve as a blueprint for the next phases of the project. This step involves consolidating all previous work, enhancing the presentation, and ensuring the storyboard is production-ready.

7.1. Organizing the Storyboard Layout
Start by arranging the frames in a logical, easy-to-follow format. This includes:
- Sequential Order: Double-check that frames are in the correct chronological order.
- Readable Spacing: Ensure frames and annotations are spaced to avoid clutter.
- Numbering: Label each frame or scene for quick reference during production.
A well-organized layout allows the team to navigate the storyboard seamlessly.
7.2. Refining Visuals
Even if your storyboard is intended to remain as a draft, clean up the visuals to improve clarity and communication:
- Sharpen Key Details: Refine rough sketches, ensuring that characters, settings, and actions are recognizable.
- Enhance Readability: Use bold lines, distinct shapes, and minimal shading to make frames visually clear.
- Consistent Style: Maintain a uniform visual style across all frames to avoid confusion.
For digital storyboards, use tools like vector lines or layers for a polished appearance.
7.3. Proofreading Annotations and Notes
Carefully review all annotations and notes to ensure they are:
- Accurate: Double-check that technical instructions and scene descriptions align with the visuals.
- Clear: Avoid overly complex language or ambiguous terms.
- Complete: Ensure no important detail is left out, such as dialogue, sound effects, or transitions.
Well-written annotations help the team interpret and execute the storyboard without guesswork.
7.4. Incorporating Feedback
Revisit the feedback received during the review phase and ensure all necessary revisions have been made. Address any concerns raised by:
- Clients or Stakeholders: Verify that their requirements and preferences are reflected.
- Creative Team: Confirm that the storyboard aligns with production capabilities and creative goals.
Finalizing is the last opportunity to make adjustments, so ensure all voices are heard and considered.
7.5. Preparing for Presentation
If the storyboard will be shared with clients, stakeholders, or a production team, ensure it is presentation-ready:
- Digital Storyboards: Compile the frames into a PDF, slideshow, or interactive file for easy viewing.
- Physical Storyboards: Arrange the frames neatly on boards or print them in a professional format.
- Accompanying Materials: Include a brief overview or script summary to provide context during the presentation.
A professional presentation reinforces the storyboard’s value and sets the tone for production.
7.6. Archiving and Backing Up
To prevent loss of work, create backups of the finalized storyboard:
- Digital Backups: Save files on multiple devices or cloud storage platforms.
- Physical Copies: Print and store hard copies in a safe place for reference.
A well-archived storyboard ensures accessibility throughout the production process.
7.7. Sign-Off for Production
Once the storyboard is finalized, secure sign-off from all relevant parties:
- Clients: Obtain approval to move forward with production.
- Creative Directors: Confirm that the storyboard aligns with the creative vision.
- Production Team: Ensure they have all the necessary details to execute the project seamlessly.
Tips for Effective Storyboarding
After following all the steps of storyboarding, a storyboard requires both creativity and clarity. To ensure that your storyboard is functional, impactful, and aligned with the project’s goals, here are some essential tips for effective storyboarding:

1. Focus on Clarity Over Detail
While it’s tempting to create detailed, polished drawings, the primary goal of a storyboard is communication, not artistry. Keep these points in mind:
- Simplify: Use clear, simple sketches to convey the action. Avoid unnecessary details that might distract from the story.
- Be Efficient: Focus on the most important elements—characters, actions, key expressions, and camera movements.
Effective storyboards are easy to read at a glance, so make sure the core story is clear, even in rough sketches.
2. Plan for the Entire Narrative
A good storyboard maps out the entire narrative, not just key moments. Ensure that:
- Each scene has a purpose: Every frame should either advance the plot or build character.
- Transitions are smooth: Make sure that one scene flows logically to the next, maintaining continuity.
Planning the full narrative ensures that the storyboard serves as a comprehensive blueprint for production.
3. Experiment with Different Camera Angles and Shots
The way a scene is framed can dramatically affect how the audience experiences it. To create visual interest and tension:
- Vary angles: Use close-ups, wide shots, and medium shots to add variety.
- Test different perspectives: Experiment with bird’s-eye views, low angles, and over-the-shoulder shots to discover the most dynamic way to tell the story.
Different angles can influence how the audience feels about a scene, so be sure to explore your options.
4. Maintain Consistency in Character Design
If you’re working on a project with recurring characters, consistency is key. Make sure that:
- Characters look the same in every frame: This includes consistent features like clothing, hair, and overall design.
- Action is believable: Ensure that the characters’ movements remain consistent across frames.
Consistency in character design ensures that the viewer can easily identify and follow each character throughout the story.
5. Use Clear and Concise Annotations
Annotations are crucial for providing context and clarifying the action, camera movements, and timing. To maximize their effectiveness:
- Be concise: Use brief but clear descriptions of actions, emotions, and camera moves.
- Use industry-standard terms: Ensure that all technical instructions (like “pan left” or “close-up”) are clear to the production team.
- Prioritize important information: Focus on the details that will impact the production, such as critical actions or camera changes.
Clear annotations provide the necessary context to make sure the storyboard’s vision is executed correctly.
6. Think About Pacing and Timing
Storyboards are often used to help visualize pacing and timing. To ensure a strong flow:
- Use the frame count to your advantage: Consider how long each shot or scene should last to maintain a proper rhythm.
- Balance fast and slow moments: Alternate between action-heavy scenes and slower, character-driven moments to keep the story dynamic.
By considering pacing, you can ensure that the story feels well-balanced and keeps the audience engaged.
7. Stay Flexible and Open to Changes
Storyboarding is often an iterative process. Be prepared to:
- Revise and update: As new ideas or feedback come in, don’t hesitate to tweak the storyboard to reflect changes in the script or creative direction.
- Iterate on feedback: Accept constructive criticism and revise the storyboard as needed to improve the flow and clarity.
Flexibility allows the storyboard to evolve and adapt to new creative challenges.
8. Focus on the Big Picture, Then Zoom Into Details
Start with rough, thumbnail sketches that focus on overall composition and key moments. After the main elements are established, then refine the details:
- Establish key scenes and moments: Identify the most important scenes and the emotional tone for each.
- Add refinement: Once you’re satisfied with the sequence, add finer details such as character expressions, props, or backgrounds.
Focusing on the big picture first ensures you’re telling the right story before you get caught up in minute details.
9. Collaborate with Your Team
Storyboarding is often a collaborative process. To ensure your storyboard is effective:
- Involve the team early: Share the storyboard with directors, animators, or producers early in the process to gather feedback.
- Communicate the vision: Be sure to explain the emotional and narrative goals behind each frame to help others understand the bigger picture.
Collaboration ensures that everyone is on the same page and working toward a unified vision.
10. Consider the Medium and Format
Finally, consider the medium or format of your project when creating the storyboard:
- Animation: Pay extra attention to the timing, keyframe movements, and detailed notes about character actions.
- Live-action: Emphasize camera angles, blocking, and actor positioning.
- Interactive or Game Design: Focus on transitions between scenes or game mechanics, noting any user actions.
Tailoring your storyboard to the specific needs of your medium ensures its relevance and effectiveness.
Conclusion
Storyboarding is a crucial step in the creative process that helps visualize and organize ideas before they are brought to life. Whether you’re working on a film, animation, commercial, or interactive project, a well-crafted storyboard serves as a roadmap for the production team, ensuring that the vision is clearly communicated and executed. By focusing on clarity, consistency, and collaboration, you can create a storyboard that not only captures the essence of the story but also helps the production process run smoothly.
While the process can be time-consuming, investing the effort into creating a thorough and thoughtful storyboard pays off in the long run. It minimizes confusion, reduces production time, and allows the creative team to visualize the project as a cohesive whole. With the tips provided and by following all the steps of storyboarding methodically, you can produce a storyboard that sets the foundation for a successful and impactful project.