What is Slow In and Slow Out Principle: The 12 Basic Principles of Animation
Contents
- 1 The Fundamentals of Animation Principles
- 2 Understanding Slow In and Slow Out in Depth
- 3 Why Is Slow In and Slow Out Important in Animation?
- 4 Techniques to Apply Slow In and Slow Out
- 5 Examples of Slow In and Slow Out
- 6 Common Mistakes to Avoid in Slow In and Slow Out
- 6.1 1. Overusing the Principle
- 6.2 2. Inconsistent Timing and Spacing
- 6.3 3. Ignoring Context of Motion
- 6.4 4. Neglecting the Role of Arcs
- 6.5 5. Over-Reliance on Software Presets
- 6.6 6. Forgetting Frame Balance
- 6.7 7. Applying to Static Movements
- 6.8 8. Skipping Planning Stages
- 6.9 9. Overcomplicating the Motion
- 6.10 10. Neglecting Viewer Expectations
- 6.11 11. Inadequate Testing and Refinement
- 6.12 Conclusion
The Slow In and Slow Out Principle is a cornerstone of animation that plays a crucial role in creating realistic and visually appealing motion. This principle ensures that movements in animation feel natural by emphasizing a gradual acceleration and deceleration at the beginning and end of an action. Animators achieve this effect by manipulating the spacing of frames, placing more frames near the start and end of a motion and fewer in the middle.
By using the Slow In and Slow Out Principle, animators can convey weight, timing, and believability in their work. For example, a swinging pendulum or a character raising their hand appears smoother and more lifelike when this principle is applied effectively. Without it, actions might seem robotic or abrupt, detracting from the overall quality of the animation.
In this article, we will explore the fundamentals of this principle, its application in various scenarios, and practical tips to integrate it into your animation workflow. Whether you’re a beginner or a seasoned animator, mastering the Slow In and Slow Out Principle will elevate your animations to new heights.
The Fundamentals of Animation Principles
Animation, at its core, is an art form that brings inanimate objects to life by creating the illusion of movement. This magic is achieved through a set of guiding principles developed by Disney animators in the 1930s, known as the 12 Principles of Animation. These principles lay the foundation for creating animations that are engaging, believable, and emotionally resonant.

One of these foundational principles is the Slow In and Slow Out Principle, which plays a pivotal role in achieving realistic motion. Before delving deeper into this principle, it is essential to understand how it interacts with other animation principles:
Key Animation Principles
- Squash and Stretch
This principle adds a sense of weight and flexibility to characters or objects, emphasizing their physicality. - Anticipation
Prepares the audience for an action, making it feel more dynamic and intentional. - Staging
Directs the audience’s attention to the most important elements in a scene. - Timing and Spacing
Determines the rhythm and flow of movement, directly linked to Slow In and Slow Out. - Follow Through and Overlapping Action
Adds realism by allowing parts of an object or character to continue moving after the main body has stopped.
Where Slow In and Slow Out Fits
The Slow In and Slow Out Principle complements the other principles by focusing on the transitions of motion. It ensures that actions do not begin or end abruptly, which could otherwise break the immersion. For instance, when a car starts moving, it accelerates gradually (slow in) and decelerates smoothly when stopping (slow out).
Understanding and combining these principles is key to creating animations that resonate with audiences. Slow In and Slow Out is especially important because it can significantly impact how believable and polished your animation looks. In the next sections, we will examine this principle in detail and provide actionable insights for implementing it in your projects.
Understanding Slow In and Slow Out in Depth
The Slow In and Slow Out Principle is one of the most crucial techniques in animation, designed to mimic the way objects and characters move in real life. It focuses on how motion begins and ends, creating a sense of realism by simulating acceleration and deceleration.

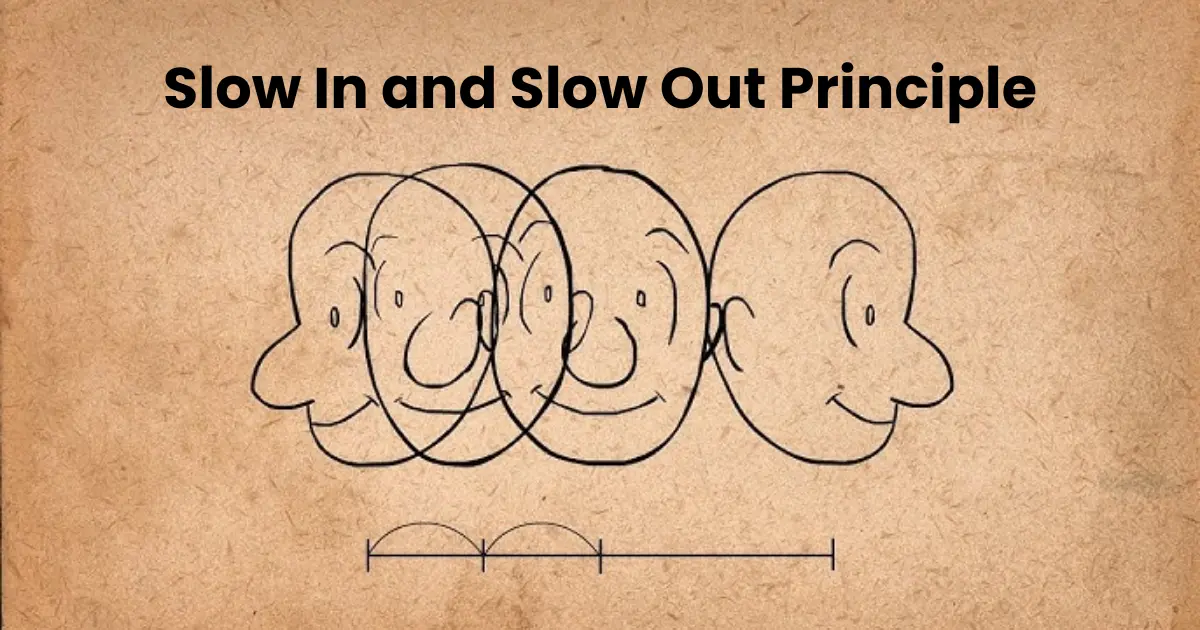
What Does Slow In and Slow Out Mean?
In animation, “slow in” refers to the gradual build-up of speed at the beginning of a movement, while “slow out” describes the gradual reduction of speed as the movement comes to a stop. This effect is achieved by varying the spacing of frames:
- More Frames: Placed near the start and end of the action for slower, smoother transitions.
- Fewer Frames: Used in the middle of the motion to depict faster movement.
This subtle adjustment prevents actions from feeling abrupt or mechanical, enhancing their fluidity and believability.
Why Is Slow In and Slow Out Important?
The natural world is full of examples of slow in and slow out. Think of a ball rolling to a stop—it gradually loses momentum before halting. Similarly, when a person waves, their hand doesn’t move at a constant speed; it accelerates at the start and slows down toward the end. Without applying this principle, animations can appear jarring and lack the emotional or physical connection needed to immerse viewers.
Examples of Slow In and Slow Out
- Object Motion: A bouncing ball that gradually loses height and speed with each bounce.
- Character Animation: A character leaning into a sprint and then decelerating to a halt.
- Mechanical Movements: A car starting up or braking to stop.
How to Apply Slow In and Slow Out in Animation
To effectively use this principle, animators need to focus on timing and spacing:
- Start with Keyframes: Define the beginning and end points of the action.
- Adjust the Spacing: Place frames closer together near the start and end, and farther apart in the middle.
- Use Graph Editors: In digital animation tools, graph editors are excellent for visualizing and tweaking motion curves. A gradual slope in the curve represents a slow start or stop.
Tools and Techniques
- Traditional Animation: Use pencil tests or flipbooks to experiment with frame spacing.
- Digital Software: Programs like Blender, Maya, or After Effects allow animators to fine-tune easing curves for precise control over slow in and slow out.
Mastering the Slow In and Slow Out Principle is essential for creating animations that feel natural and captivating. By paying attention to how movements begin and end, you can breathe life into your animations, keeping viewers engaged and immersed.
Why Is Slow In and Slow Out Important in Animation?
The Slow In and Slow Out Principle is essential for crafting animations that resonate with viewers, making actions feel fluid, realistic, and emotionally compelling. Without it, movement would appear unnatural, robbing the animation of its immersive potential. Here’s why this principle is so important:

1. Creates Realistic Motion
In the physical world, most actions follow a pattern of acceleration and deceleration. For example:
- A swinging pendulum starts slow, speeds up in the middle, and slows again at the peak of the swing.
- A person picking up an object doesn’t yank it instantly but accelerates smoothly, then slows as they reach their target.
Incorporating slow in and slow out mimics this natural phenomenon, helping the audience connect with the animation.
2. Enhances Visual Appeal
Abrupt and jerky movements can be distracting and off-putting to viewers. The Slow In and Slow Out Principle adds a layer of polish by smoothing out transitions, making animations visually pleasing. For instance, in character animation, it ensures that gestures and expressions flow seamlessly.
3. Conveys Emotion and Intent
Subtle variations in motion can communicate a character’s feelings and intentions.
- A shy wave might start very slowly and fade out gently, conveying hesitation.
- A triumphant fist pump could accelerate quickly and slow out dramatically, expressing energy and confidence.
4. Improves Animation Timing
Good timing is crucial for animation, and slow in and slow out plays a major role in defining it. By strategically spacing frames, animators can emphasize key moments, like a dancer’s graceful leap or a vehicle’s dramatic stop.
5. Integrates with Other Animation Principles
The Slow In and Slow Out Principle works hand-in-hand with other foundational principles like:
- Timing and Spacing: Determines the rhythm of movement.
- Follow Through and Overlapping Action: Ensures parts of the object or character move naturally after the main action.
- Ease in Motion Graphics: Especially in digital animations, it helps create professional transitions between scenes or movements.
6. Supports Immersion in Storytelling
In animated storytelling, viewers subconsciously expect movements to follow the rules of the real world. Whether it’s a falling leaf or a superhero landing, slow in and slow out aligns motion with audience expectations, drawing them deeper into the narrative.
The Slow In and Slow Out Principle is not just a technical aspect of animation—it’s a storytelling tool. It transforms static motion into dynamic, believable actions that capture the viewer’s attention. Whether you’re animating a playful character, a dramatic scene, or a simple bouncing ball, this principle ensures your work stands out with realism and finesse.
Techniques to Apply Slow In and Slow Out
Applying the Slow In and Slow Out Principle effectively requires a combination of creative judgment and technical skill. Whether you’re animating traditionally or using modern digital tools, these techniques will help you master this principle:

1. Understand Timing and Spacing
The essence of slow in and slow out lies in manipulating the timing and spacing of frames:
- Closer Frames at Start and End: Place frames closer together to create a slower motion at the beginning and end of the action.
- Wider Frames in the Middle: Spread frames further apart in the middle to simulate acceleration.
2. Use Keyframes and In-Betweens
Start with the main keyframes that define the beginning and end of an action. Add in-betweens to smooth the transition:
- Add More In-Betweens: Near the keyframes to create a slow start or stop.
- Limit In-Betweens: In the middle of the action for faster movement.
3. Leverage Digital Animation Tools
Modern animation software offers tools that make applying slow in and slow out easier:
- Graph Editors: Programs like Blender, Maya, or After Effects have graph editors that allow you to control motion curves. Adjust the curve to have gentle slopes at the start and end for easing in and out.
- Ease In and Ease Out Functions: Built-in presets can automate the creation of gradual transitions.
4. Experiment with Arcs
Combine slow in and slow out with the principle of arcs. Most natural movements follow an arc, such as the swing of a pendulum or the arc of a jumping character. Gradual transitions along the arc enhance realism.
5. Adjust Ease Parameters
In digital tools, tweaking ease settings refines motion:
- Ease-In: Slows the start of the motion.
- Ease-Out: Slows the end of the motion.
- Custom Curves: Create personalized easing curves for more nuanced effects.
6. Analyze Real-World Motion
Observe how objects and people move in real life. For instance:
- A car braking to a stop.
- A ball rolling and slowing due to friction.
Use these observations to replicate realistic motion in your animations.
7. Test with Motion Paths
For complex animations, use motion paths to guide objects or characters. Modify the path’s velocity to ensure a gradual start and stop, creating smooth transitions.
8. Review and Refine
After applying the principle, review your animation:
- Play at Different Speeds: Ensure the slow in and slow out effect feels natural.
- Seek Feedback: Share your animation with peers or mentors to identify areas for improvement.
Practical Example: Bouncing Ball Animation
- Draw or define the ball at its start and end positions (keyframes).
- Place more frames near the peak of the bounce (slow out) and near the landing (slow in).
- Add fewer frames during the descent and ascent for faster movement.
By incorporating these techniques, animators can breathe life into their work, ensuring each action flows naturally and captivates the audience. The Slow In and Slow Out Principle is not just a technical tool—it’s an artistic approach to creating motion that feels intuitive and compelling.
Examples of Slow In and Slow Out
The Slow In and Slow Out Principle can be observed in various real-life scenarios and animations, enhancing realism and fluidity. Below are some practical examples showcasing its application:

1. Bouncing Ball
- When a ball bounces, it starts with slow upward motion (slow out), speeds up as it descends (fewer frames), and slows again as it reaches the peak of the next bounce (slow in).
- Frame spacing: Denser at the start and end of each bounce, wider in the middle.
2. Car Acceleration and Braking
- A car does not start or stop abruptly.
- Acceleration: The movement begins slowly as the car builds momentum.
- Braking: The car decelerates smoothly before coming to a stop.
- In animation, this can be achieved using easing curves or custom frame spacing.
3. Character Movement
- Hand Wave: A character waving their hand starts with a slow movement (slow in), accelerates mid-wave, and decelerates as the wave concludes (slow out).
- Jump: When a character leaps, they push off the ground slowly (slow out), accelerate mid-air, and land with a gradual deceleration (slow in).
4. Pendulum Swing
- A pendulum’s motion demonstrates slow in and slow out naturally:
- Start of Swing: Slows as it reaches the peak of its arc (slow out).
- Mid-Swing: Speeds up at the bottom of the arc (fewer frames).
- End of Swing: Slows as it ascends to the opposite side (slow in).
5. Facial Expressions
- Subtle expressions like a smile or frown also follow this principle:
- Smile Formation: Begins with slow movement as lips curve upward (slow in), accelerates mid-smile, and slows down as the expression is completed (slow out).
6. Door Opening and Closing
- When a door opens:
- Slow Out: Starts with gradual motion as the handle turns and the door moves.
- Mid-Movement: Speeds up as the door swings.
- Slow In: Decelerates as it reaches its fully open or closed position.
7. Object Pickup
- When a character picks up an object, they move their hand slowly toward the object (slow in), accelerate as they grab it, and then slow down again while lifting it (slow out).
8. Nature Elements
- Falling Leaves: Leaves start falling slowly, accelerate mid-descent, and slow down before settling on the ground.
- Water Droplets: Droplets falling from a faucet start slow, speed up in the middle, and create a splash at the end.
9. Complex Action Sequences
- Running Start: A character leans forward (slow out), builds speed mid-run, and slows as they come to a stop (slow in).
- Dance Movements: Smooth transitions between poses often rely on slow in and slow out to convey elegance.
Application in Digital Animation
- Tools like Blender, Maya, and After Effects help animate these examples with ease.
- Using graph editors to create curves that ease in and ease out enhances these effects.
By studying and implementing these examples, animators can ensure their work feels more natural and engaging, drawing the audience into the world they create.
Common Mistakes to Avoid in Slow In and Slow Out
While the Slow In and Slow Out Principle is essential for creating smooth and realistic animations, there are several pitfalls animators should be aware of. Avoiding these mistakes ensures that your animations remain natural, engaging, and professional.

1. Overusing the Principle
- Mistake: Applying excessive slow in or slow out to every movement, making actions feel sluggish and unnatural.
- Solution: Use this principle selectively, where it enhances the flow of motion. Quick, sharp actions like a sudden jump or punch may not require as much easing.
2. Inconsistent Timing and Spacing
- Mistake: Incorrect placement of frames can make motion appear uneven, jerky, or disconnected.
- Solution: Carefully plan the timing and spacing of frames, ensuring gradual acceleration and deceleration. Use reference videos or motion studies to guide your spacing.
3. Ignoring Context of Motion
- Mistake: Applying the same easing pattern regardless of the action or character. For example, a heavy object and a feather have different movement patterns.
- Solution: Tailor the application of slow in and slow out based on the weight, speed, and nature of the object or character.
4. Neglecting the Role of Arcs
- Mistake: Overlooking the integration of arcs, resulting in linear or robotic motion.
- Solution: Combine slow in and slow out with the principle of arcs to ensure smooth, natural movement.
5. Over-Reliance on Software Presets
- Mistake: Depending entirely on built-in easing presets like “ease in” and “ease out,” which can sometimes lead to generic or overly mechanical results.
- Solution: Customize easing curves using graph editors to achieve nuanced and expressive motion.
6. Forgetting Frame Balance
- Mistake: Placing too many frames at the start or end without balancing the middle, which can make movements appear lopsided or incomplete.
- Solution: Distribute frames proportionately to maintain a sense of acceleration and deceleration.
7. Applying to Static Movements
- Mistake: Using slow in and slow out where it isn’t needed, such as static poses or minor actions.
- Solution: Recognize when a constant motion or static position serves the animation better.
8. Skipping Planning Stages
- Mistake: Jumping straight into animating without planning keyframes or studying references, leading to inconsistent results.
- Solution: Begin with a rough outline of keyframes, then add in-betweens while focusing on easing transitions.
9. Overcomplicating the Motion
- Mistake: Overcomplicating the frame distribution, which can distract from the main action.
- Solution: Keep the motion simple and purposeful. Ensure the slow in and slow out enhances rather than overwhelms the animation.
10. Neglecting Viewer Expectations
- Mistake: Creating motion that feels unnatural to the viewer, such as abrupt transitions or unnatural pauses.
- Solution: Always test animations with an audience or colleagues to gather feedback and make adjustments as needed.
11. Inadequate Testing and Refinement
- Mistake: Not reviewing the animation at different speeds or failing to refine the motion.
- Solution: Playback the animation at various speeds to catch inconsistencies and ensure smooth transitions.
Avoiding these mistakes will help you master the Slow In and Slow Out Principle. Proper application of this principle ensures animations feel polished, realistic, and aligned with the audience’s expectations, elevating the overall quality of your work.
Conclusion
The Slow In and Slow Out Principle is a cornerstone of creating animations that resonate with realism and appeal. By emphasizing gradual transitions at the beginning and end of a movement, it ensures a natural flow that mimics real-world physics and behaviors. This principle not only improves the visual quality of animations but also adds depth and believability, making characters and objects feel more alive. Whether animating a bouncing ball, a character’s intricate movement, or a complex action sequence, the thoughtful application of this principle brings the animation to life.
Mastering slow in and slow out involves understanding its interplay with other animation principles, such as timing, arcs, and anticipation. Its proper usage enhances the smoothness and readability of actions, while its misuse can lead to unnatural or jerky results. Animators who grasp this principle can create animations that are both technically polished and emotionally engaging. By paying attention to the subtle dynamics of easing in and out, animators can transform simple movements into captivating expressions of life and energy.